Beautiful DIY Spring flower arrangements that you can make easily at home. Of course, serving great food and drink is essential to every get-together but so is making sure your house looks good too. This post looks at creating a really simple DIY Spring flower arrangements. These flower arrangements can be made with almost any type of flowers you have access to. I often buy cheap flowers and make cute floral designs that I use to beautiful my house or gift them to friends and family.
Spring Flower Bulb Arrangement
Materials:
- Flower Bulb
- Flower Pot
- Moss
Process
This first Spring arrangement is a very straight forward spring bulb tribute. The first step is to pick your pot and add some soil. I like to select colored pots for these types of arrangements because Spring is all about color.
Next, take off the plastic pot or planter’s pot that the bulb was bought in. Loosen the root a little bit with your fingers. This step is especially important if you have bulbs that are root-bound. Also, cut off any damaged or rotting roots.
Stick the bulbs into the pot and add some dirt on the sides. If your bulb fills the pot perfectly well and good.
Finally, add some moss to the pot. Moss comes in sheets, so just break it up and tuck it in all the way around. When it’s done, you’re going to see a beautiful tribute.
This Spring bulb arrangement is perfect for decorating a desk. It’s also great on a side table, perfect on a kitchen counter. You can also wrap it up in a little bit of cellophane add a nice spring bow to make a gift. Take it to someone’s house as a housewarming gift or as a hostess gift.
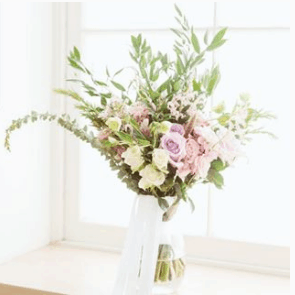
Colorful Spring Flower Arrangements
The next arrangement is a bit more complicated than the one discussed above however, it’s easy to create. Remember if you don’t think you can do a great job with flower arrangements you just need a little bit of practice.
Materials
- Ruscus Greenery
- Tulips
- Daffodil
- Ranunculus
- Muscari
- Glass Vase
- Clippers
DIY Spring Flower Arrangements Process
The first step is to take a vase and fill it with 2/3 water. If you have flower food also add it in at this time. I start always with my greenery. In this floral design, I am using ruscus leaves which is wonderful foliage for flower arrangements.
You could also use other types of greenery such as fern. If you have some plants growing around your house you can just take my clippers and head up into the bush. You will come back with a wide range of different greens that are growing wild.
Trim the branches short so that they fit in the vase. For this type of arrangement, we don’t want it to be large because we want people to see each other across the table. So cut the branches shorter than you would for a big arrangement. Add them to your vase and you have a good base for a beautiful arrangement.
Then take your first set of flowers for me it was the tulips. Tulips are quite tall so I trim them rather low and just keep adding those tulips in amongst the greens. I try to evenly space them and turn the arrangement as I go to make sure they’re evenly spaced.
The next set of flowers is the beautiful yellow daffodils. They are also quite tall, so I’ll trim them low and again place them in evenly amongst the greens and the tulips.
The next flower is a total stunner ranunculus. Ranunculus come in a wide range of color we’d have white, ivory, pink, yellow, and orange. You’ll be amazed at the amount of color these beautiful blooms add to the arrangement. I like how the flowers peak up when you place them into the arrangement.
The final set of flowers is one of my favorites this is muscari or grape hyacinth. They are also long-stemmed so trim them short just like with the other flowers.
Note:
Trim the ends of the stems and that’s important every time you add a fresh flower to any arrangement. It helps make sure your flowers can take in water and stay fresh a bit longer.
Top up the vase with water and your arrangement is ready to be placed in your desired location. Remember to top up the water and keep your flower arrangement fresh for longer.
That is the whole DIY Spring flower arrangements done. Now you have a lovely springtime arrangement that would be great in the middle of a table. It’s can also be a wonderful centerpiece for your living room in the middle of a table anywhere you choose to place it. However, don’t place your arrangement in direct sunlight as your flowers will die sooner.
If you love DIY flower arrangements, then be sure to check these related posts. DIY Simple Roses Anniversary Flowers and Simple DIY Centerpiece Arrangements.
Conclusion
I hope you found this post helpful, if you did, please share it with others. Also, pin it for future reference and also take a moment to follow me on Pinterest and remain updated on future posts.